How to Fix Miele Vacuum Not Powering On
Miele vacuums come with a variety of features, and it’s no surprise they have become some of the most trusted names in vacuum cleaners. Miele canisters are particularly well-known for their power, versatility and convenience—especially when it comes to their canister vacuums. However, the Miele canister vacuum has a tendency to fail over time, leaving users frustrated as they attempt to clean their homes. The most common symptom is that your Miele vacuum will not turn on. Luckily, it’s possible to fix this common Miele problem yourself if you know what to do. In this article, we’ll provide step-by-step guidance on how you can repair your Miele canister’s cord reel so that you can get back to cleaning your home quickly and easily. We’ll cover all the necessary tools, materials and instructions—and best of all, you won’t even need any special skills or experience! With our guide in hand, you’ll be able to make sure that your Miele vacuum functions as effectively as ever while preventing further damage down the line. With these tips and tricks in mind, there’s no reason why Miele owners shouldn’t be able to simply enjoy the great performance of their beloved vacuum cleaner.
The first thing you are going to need to do is watch this video that goes over how to open your Miele canister to replace the cord reel. It also goes over how to replace the Miele power switch, which you should do first anyway because it is a simpler and much cheaper repair compared to the cord reel.
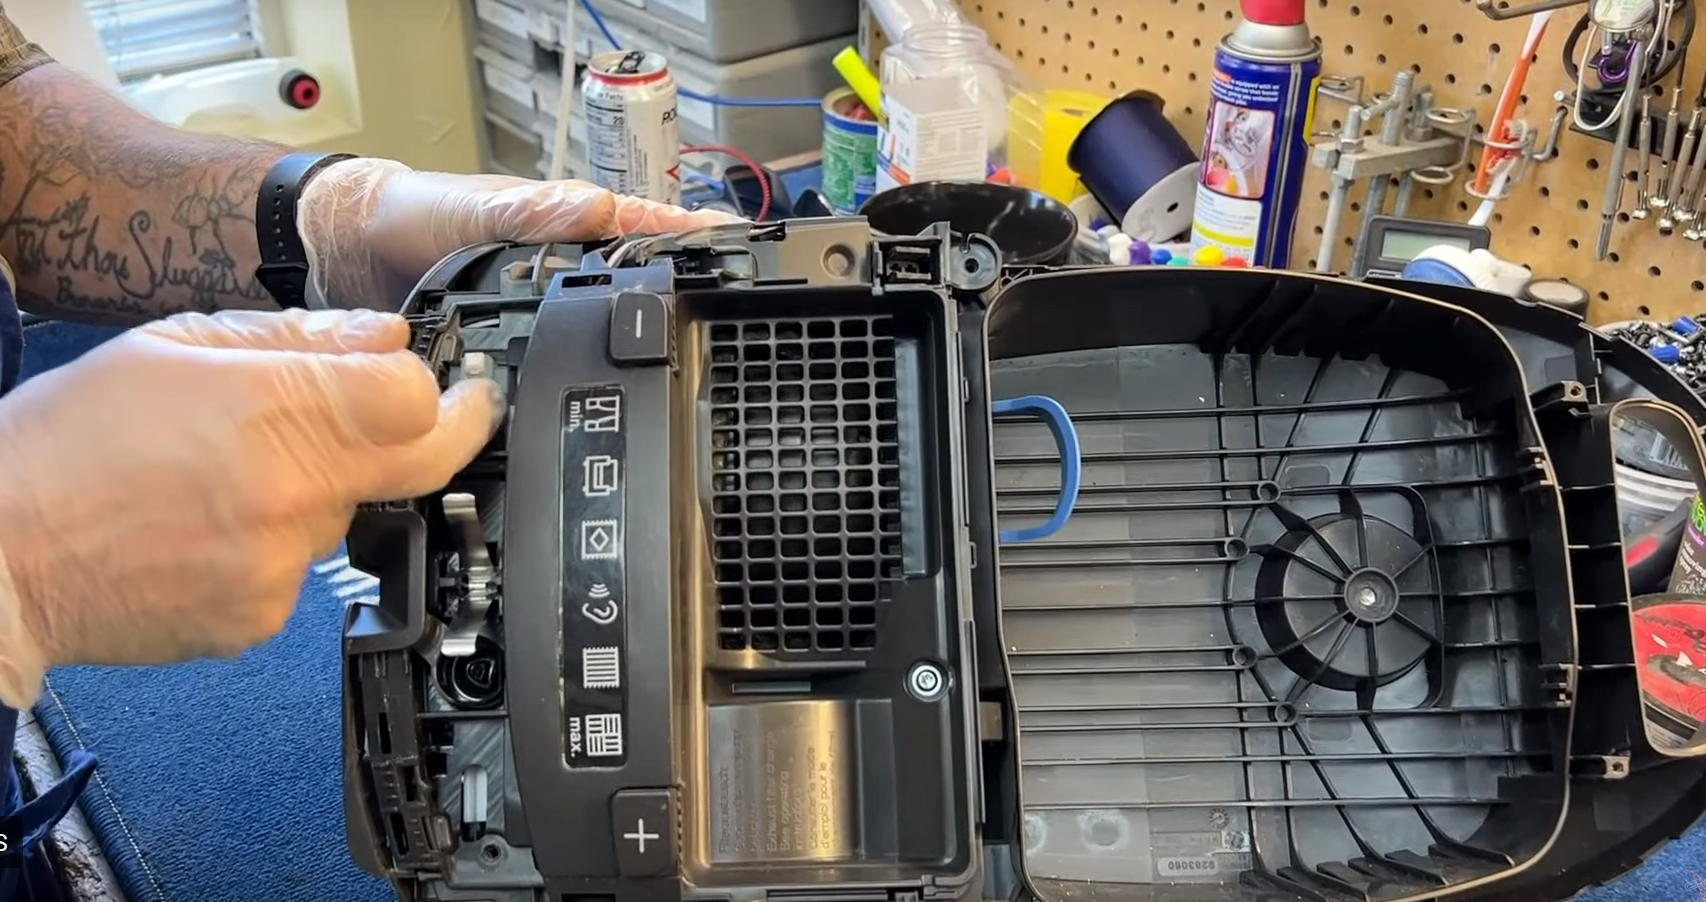
Replacing a Miele Power Switch and Opening Your Miele
Once you’ve got your Miele canister open and you’ve tested the power switch to make sure that the power switch isn’t the issue, you can now move on to testing your cord reel. If the cord reel does not have continuity, then you need to start to replace your Miele cord reel.
Testing and Replacing Your Miele Canister Cord Reel
If this still is not your issue, you are going to have to replace your Miele motor. This is a very time consuming and expensive repair that should be done by your nearest certified Miele repair center, like us! If you’re feeling brave and understand that electrical components can be a danger, you can watch the video below to ensure that you know the basics.
Miele Canister Vacuum Motor Replacement
Replacing the motor can be expensive and time consuming. Make sure that everything else has been tested good prior to replacing your Miele motor. It is also important to consider bringing your machine into a certified repair center for this repair.
Transcripts for Miele Repair Videos
Miele Canister Power Switch
Hey, I’m Josh from Vacuums R Us & Sewing Too in Arvada, Colorado and Boulder, Colorado. Today I’m going to show you how to replace a power switch in a Miele canister. I’m also going to show you how to troubleshoot a couple things in here. This Miele was checked in because it would not turn on. Best case scenario if you have a Miele that’s not turning on, it could be the power switch. They range from 15 to 25 dollars and the installation really varies on your model. What we’re looking at today is an S8. It’s the same as this C3, so if you have a Miele C3 this video is going to be very relevant as far as getting inside the machine. If you have an older machine, you’re probably going to find none of this is relevant. It’s much easier to get into, however. These are difficult machines to get into if you look on the Internet, you’re going to see a bunch of videos. They’d say you must have special tools to get into the Miele canister. We want to warn you ahead of time it is easy to break the components on this, because the machine is snapped together more than it’s screwed together. So, you’re going to be snapping little things here and there apart. You don’t really need any extra tools. I don’t know what they’re talking about. I’m going to use a putty knife so this strip that goes around the machine connects the top and bottom half of the machine together. You can start by taking it apart from up here, and this is a lot like working on a Samsung or iPhone where stuff is pressed together just right, and you must pop it in the right places to get it apart.
So, I’m going to go into the crack between this bezel back here and the power switch. I will just pop that up right there and now I can pull that off a little bit. I’ll repeat the same on the other side. Pop that up a little bit, so now I have this back and then. There to get the power switch off. I’ll pop it out after you get it off. You can see that there’s a tab right here that I had pressed into right there, and there’s also a tab that’s on the front as well that you can depress to get it to pop off at the rear. You have these little thingies that push through the rear. Both sides are the same. I’m going to go ahead and repeat that same process on this side. Pop that tab out a little bit. It should be loose now and then the rear wheel can slide out. We are going to need to take the lid off now as well. For this you’ll need a Flathead screwdriver, probably one that’s a little large, and then you just go under here and wiggle. That’s going to just pop right out on both sides. There are no cool connections there. The electricity that flows to your power hose, the connection that’s made there is a gate that plugs in when you close the lid. So, there are no wires that run directly into this hood. As a brand-new filter in this machine. So, I’m going to pop this and get it out of the way, so we don’t mess it up.
Next, we’re going to take out these screws. These are torx screws, a lot of people call them stars, they’re not standard Phillips head. These are T20 size screws. Those are the screws I needed for the upper housing. If it doesn’t come apart and it sticks, just try to pop it on the side a few times and that will loosen it up. You’ll see this gray strip that’s coming off as a separate piece. Then you have Your upper housing. We’ve now exposed the power switch right here, but we can’t test it because we can’t get to any of the wires there. There are two other screws I just popped out: one up here that hides under the filter and there’s one down here that’s buried quite deep. So, when you do get your T20 torx bits you want to get the long bits like what I have to be able to reach down there. Now this is going to pop up, but it’s a little bit tight because there’s an electrical plug where it plugs into the lower base. So, you kind of wiggle it back and forth. The plug is right here. You must be super careful because if this is a customer machine you’re working on, you can leave marks there, which is not professional. Now this is the plug I was talking about that we were working on. Now that it is exposed, we have a printed circuit board, and we have the power switch. We don’t have to go any farther at this point if the power switch is an issue. I’m going to test the power switch for continuity quick. And what we’re looking for is in one position, the power switch should not have continuity. That’s the off position and then the other position should have continuity. I’m going to take my multi meter. This is the setting I use on my multi meter to check continuity. I always check to make sure I have it set right and that everything is connected. Then I will touch both poles of the switch. I can hear the beep, so I have continuity here, which means the switch does have power going through it. I’m going to turn the switch off and now I have no continuity. What this tells me in this case is that my switch is good. If your switch is bad, it’s very easy. It’s an easy repair, you just pop the switch out. There are two little clips on either side of the switch that are going to hold it in. You pop it out and then you just pull these blades off. Which are tight on this one. You pull these blades off and you can go ahead and replace the switch. I’ll link to the part number as well as a few places that you can get that switch below. If you find that the switch is functioning, you have something else going on here. There’s a couple of different possibilities such as the cord reel or motor that I will cover in my next Miele repair videos.
Miele Cord Reel Replacement
My name is Josh from VacuumsRus & Sewing Too in Arvada and Boulder, Colorado. We are going to be continuing our Miele repair today. We have already tested the power switch on this Miele, and we found that the switch was good, so we’re going to move on to some other troubleshooting ideas here. Something that’s very common with Miele vacuums Is that the cord reel goes bad. Your cord reel goes in, and it looks fine to you. However, it may not have continuity. That means the power may not be flowing through the cord reel and into the circuit board and into the motor.
We’re going to pop this open. Now we have access to the cord reel, and it should pop out without any significant issues here. Now we have exposed the two leads that come off the cord reel. Here is the negative connection and here is the positive. I’ll pull the lead tester and my continuity tester on my multimeter. That’s going to test for continuity. I always test to make sure I’m set properly. We have continuity on that side, I’m going to test the other side of the cord, and I have continuity on that as well, which means that my cord reel does have continuity. Miele started manufacturing their cord reels and simply put it is difficult to tell at this point where Miele is manufacturing anything. They’ve retained the made in Germany sign on their units, but we are aware that many part numbers have changed because many of their components are now being manufactured in China and then they just kind of get slapped into the machines in Germany. So strictly speaking, you know, made in Germany is relative. I believe around the time that we saw a lot of the part numbers changing to Chinese part numbers was also around the time that we saw the failure rate of things like core drills increased dramatically.