How to Fix Shark Vacuum Brush Not Spinning

We see tons of Shark vacuum cleaners in our shop for repair. One of the most common issues that occurs is that the brush roll will not spin. Here, we break down why that might be, and tell you how to fix it.

  1. The Brush Roll is Wrapped with Hair: If the brush on your Shark is wrapped with hair, there is a possibility that the friction caused by this melted your brush, making it unable to spin. First, try spinning the brush with your hand. If you are unable to do this, you likely need a new brush roller as yours has seized. If this doesn’t work, continue to the below steps.
  2. Floor Selector Switch is Disengaged: Most Sharks have a switch that can select either hard flooring or carpet. With hard flooring selected, the machine will turn off the brush roll. Make sure that this switch is on carpet mode.
  3. Belt Broken: Shark brushes are operated by a belt. If this belt breaks, the brush roll will not spin. You can easily check the belt by either removing the base plate on the Shark or – if you have some experience – by spinning the brush roll by hand and feeling for tension. Note that the belt rarely snaps on Shark vacuums, so this is not likely to be the case. If the belt is the issue, replacing it is fairly simple.
  4. The Brush Roll Switch is Broken: This is the most common issue that we see with Sharks at our authorized repair center. Below, we explain the issue and show you how to fix it.

Shark Micro Switch Replacement

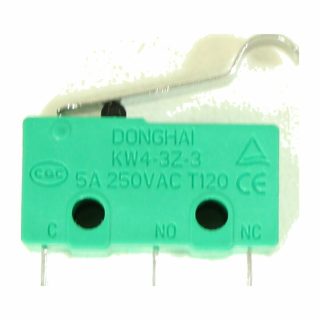
If you checked your brush roll, floor setting, and belt but your brush roll is still not spinning, that means you probably need a Shark micro switch replacement. This small switch tells the vacuums brush when to start spinning. Once the switch is damaged, you will find that no matter what you do, the brush will not move. It’s a critical part of the vacuum’s motorized brush system, and when it’s damaged or worn out, the brush roll won’t turn even if the motor is running.

Replacing a Shark micro switch is a relatively easy fix, but it’s essential to ensure that you have the correct replacement part for your vacuum model. Below, you can find the Shark micro switch that is in every Shark Rotator and Navigator vacuum, as well as most other models.

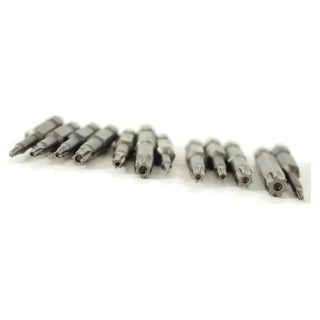
Once you have the replacement part, you can watch how our Shark technician goes about completing this repair by watching our video down below.

Replacing the micro switch is usually a straightforward process that just involves some elbow grease and a little bit of know-how from our video. However, if you’re not comfortable working with electronics or have limited experience with DIY repairs, it’s best to consult a professional or authorized Shark service center, like us!

How to Replace Shark Vacuum Micro Switch Video

In the video below, Josh – our certified Shark vacuum technician – will break down how to complete this repair and what supplies and parts you will need.

Why Doesn’t My Shark Vacuum Brush Roll Spin? Transcript

I’m Josh from VacuumsRus & Sewing Too in Arvada and Boulder Colorado. Today we’re going to talk about replacing the brush roll or micro switch on a Shark vacuum. This is a video that is applicable to you if you have a Shark vacuum, and the brush roller is not spinning. A lot of people are going to assume that their belt is broken. That is rarely the case. Usually, the belt is not broken and there’s other technical issues. I’m going to show you how to open it up and how to test the micro switch. This is realistically one of the only feasible repairs for Shark vacuums because the micro switches are about 10 bucks and it’s doable. I’m going to take the upper body off this machine. Depending on your model it may be different. One thing I will forewarn you what we’re working on here is a Shark that has a singular brush roll. Some of the newer Sharks – they frequently call them Shark Duo Clean vacuums – they have two brush rolls, one after the other. Those are an order of magnitude harder to work on then these and personally if somebody brought one into my store, we would probably quote about $150 in labor because of how time consuming it is and the likelihood that something will get broken in the process. So, if you have a single brush roll this video is going to be applicable. If you have a double brush roll and you’re a glutton for punishment, then you can watch the video and kind of figure is out. This particular Shark has Philips head screws on it that is not typical. Most Shark vacuums have what people typically refer to as a star shaped screw. They are what we call security bits. They’re not a regular screw, they’re used because Shark does not want their products to be repaired, they want them to be disposed of so they can sell you more products. That is the business. Model, but you can get those bits. Do a search for security bits. You can usually get a set of the full range of bits that’s anywhere between 5 to 10 different sizes. For like 12 to 15 bucks, you’ll need that. For most Sharks. This one I’m going to start popping screws out. Again, a micro switch failing is the most common reason at this point. Sharp Brush roller stopped spinning. What the micro switch does is detect if the Shark is in a reclined position. So, when you put your Shark in an upright position, your brush stops spinning. When you recline your Shark, the brush will stop spinning again. So now I’ve taken out a bunch of screws, but I’m not done with these two front wheels right here. There’s actually screws hidden underneath. Of those are pressure fit in. You can pop them out with a screwdriver. While I’m at it, I’m going to pull some of this hair off the axel shaft there that piece of felt is there intentionally and I’ll leave that on. The theory behind that piece of felt is it will prevent hair from building up as quickly. We see how effective that was. You know. Basically, vacuum cleaner geniuses these Shark guys are. There are two more screws here. One here. And if you haven’t got the gist, generally, professionals in my industry are not fans of this brand. We’re not in love with disposing of a product because $5 parts broke. We also are not in love with the idea of making it very, very, very difficult to even do basic service on the product so there’s one final hidden screw back here. Left there to frustrate you. And I’m going to pop that puppy out. Pop it out. Maybe going to flip it over. It’s not out of it. This will give. Left in the video, maybe it’ll get cut out. You know? Here we go. OK, so now at this point I can. Take the lid off. And there’s headlights right here, and so there’s a wire connecting to the printed circuit board. That wire just pulls out. There’s no clip on it. And that’s the wire that’s. Going to feed into the headlights so. That’s out one of the side plates also fell off. I’ll just set that aside. What we’re going for here is this micro switch right here, and you can see when the machine goes in an does upright position, it engages the switch, so engage the switch is off and not feed any power to this assembly down here when you recline the machine, the switch opens, and power is fed to the machine and the brush roller will then spin. That’s what the micro switch does, because there’s a lot of debris in here, because these are very inefficient vacuum cleaners. They kick up a lot of dirt that kicks around in here. These switches very frequently go bad. The first thing you need to test it, it’s almost impossible to test your circuit board if your circuit board is bad, you might be able to find a used one on eBay or something like that. It’s also almost impossible to test your motor. You can’t jump the motor because I believe it’s damaging. I think it’s a 12 Volt and this is 120. I don’t like to jump those motors because I’ve had It burn up on me. The switch we can test, so I am going to. Pop out the knuckle here. I get around in there and there’s one screw right here holding my micro switch head now. At this point. I’ve been into. A whole bunch of Sharks and they all use slightly different parts, brush roll motors, and. PCBs tend to. Be the same, but everything around them is different. The one thing I have not seen different though is a micro switch. Every Shark I’ve ever taken apart actually has the same sinking micro switch in it, so hopefully that’s what you have. I’m going to go ahead and link a. Source for these switches. In the description. A source that I know is good. There’s one little screw right here. Holding my micro switch in, I’m going to pop that out on the other side. There’s a nut on the other side, so we don’t want to lose that. Screw it. And then not that I just said we don’t. Want to lose there? We go. OK, and now my micro switches off, so I’m going to test this micro switch. We could have done this while it was there, but I’m going. To test the micro switch, there’s a micro switch test ad. Then we know for positive for certain the reason the brush roll is not running is because it’s bad. So, I’m going to use a multi meter. You can also just use a continuity tester. That’s the setting on my multi meter to test for continuity. I always test to make sure I’m set properly. I am so this micro switch is good. So, I’m going to get electrical continuity on this right here and electrical continuity here. And you can hear my multimeter is telling me I do have continuity. What you’re going to want to do is depress the switch test again. And you should have. No continuity when the switch is closed. Open the switch, get continuity. Close the switch. No continuity, open continuity, close, no continuity. That’s a good switch if you get no continuity. Open and close your switch is bad and go ahead and replace it. We’re going to go ahead and replace this switch as a demonstration. First things first, I’m going to cut off this shrink. That’s right here with a razor blade. Right in the middle here, sorry. This is going to. Require this, this job is going to require soldering. Uh, there’s any number of ways to get around soldering. I’m going to Sauder it because that’s the. Best way to do it? I mean, there’s some clips you can use stuff. Like that? I would just invest in a good soldering iron. because you need one in your house anyway. So, I’m going to go ahead and slice these off. As always, this is a. Difficult repair if you don’t feel comfortable with it if you’re not. If you’re not authorized. I don’t know vacuum tech. Don’t do it. Alright, so I’ve got my iron heated up. I’m going to go ahead and solder this again. This is a complex electrical repair. If you’re not comfortable doing it, bring it into an authorized service center. And they could do this for you. If you’re not comfortable with soldering or not familiar with it, there’s lots of soldering videos on YouTube that you can watch to get more comfortable with it. I’m going to walk you through this, so I’ve taken some flux. This is just the regular old flux they sell at Home Depot for soldering pipes together. My rule with soldering is more flux, more flux. Did you use more flux? Go ahead and use more flux. I’m going to. Put some flux on there. I’m going to pause the video to go find safety glasses. OK. There are safety glasses. Alright, I’m back with safety glasses. You want to put safety glasses on for this because we’re going to be. This is hooked soldering. It’s hooked through. We’re going to decide and pull it out, and sometimes you can get little flecks of solder that kind of spit out when you’re when you’re pulling that out. So, you definitely need to have your safety glasses on, as Bill Nye the science Guy. Let’s say glasses on. I’m going to clean. My tip quick. And I’m going to apply some heat right here, and hopefully we can get a good flow. It looks like I’ve got a good bridge and. I’m going to pull that hook off. Keep it hot. Doesn’t matter how hot these stays, it doesn’t matter if we melt the inside of. This switch because it’s already bad. All right, so I got one off rate that Aw, that’s hot. Oh, please leave that in the. Video and I’m going to grab the other one. From the bottom, typically. As best he tries is see. If I get a good bridge, there you can see it flow. It kind of changes color. Twist that backlog applying heat and there we go. We got it D soldered. This is pretty good. This is actually a pretty good solder rate here. It’s clean. I don’t have a lot of goops on there. If I did, I wanted to remove some of the sod, or you can buy Wick which is specifically for this purpose, but if you don’t have which you can strip some wires, some old wire like this. Get a little bit of flux on. Them and if. You apply heat to your wire and then rub this on. Here a lot of the solder will wick into this extra wire, and you see how my wire now a little bit is thinner, so we’re going to be a little bit easier to work with after I’ve removed that solder there. I’m going to do the same thing over here, just a little bit. Off but wrong side doesn’t have flux. And then. And you want to put flux in your Wick. That’ll help this entire process again, my rule is more so you can see on my Wick just change color a little bit because it took on some of the solder from those other wires. And those are good clean wires. Now I’m not going to have any problem getting those. Soldered on and hooked into the new switch. The new micro switch. So, the microswitch you receive. Is most typically going to have three contact points on it. You only need two of those three contact points. I believe you could leave the third contact point on and not have a problem. I typically go ahead and clip them off. With a pair of wire cutters. Just to get it out of. The way to some degree. But you’re going to be using these two outside contact points. OK, so I’m going to go ahead. I’ve got some shrinks wrap right here, some heat shrinks. I’m going to put it on my wires and I’m going to push it down. Well out of the way of my soldering because if my soldering iron gets hot. Here these shrinks will melt. And I’m going to go ahead and. I’m going to install my switch. There are holes in the switch and tented for the wires to go through and then hook. You can bend them. So, my little. Hook right there. OK, so now I’m going to go ahead and solder. I’m going to add a little bit of. Flux on that. Again, the rule my rule of soldering is more flux. Always going to flow easier if you got flux all over the place, you little bit smokier but. I’d rather deal. With a little bit of smoke then have. To redo soldered rides over and over. So, I’m going to go ahead clean. My solder tip again. A little bit of Sauder on there should be pretty good and I’ll hold this out and just hold some heat under there. Let it flow. Pull it off. You don’t want to hold it on. Too long, or else you will. Melt the inside of that, switch them. Heat will go. Right up that blade and melt the inside of your switch, which you do not want. You can tell the Sauder flows because. Everything will change color, it’ll get shiny. And then when it is. Cooled right there. I’ve got a. good flow when it has cooled it will change to a map color. You can see that matte color right there. And that’s that for the solder I’m. I’m going to tip my iron. I am done with it, so I’m going to tip my iron and turn it off. I’m going to crush that down a little bit. I had that I didn’t have it crushed down. As much as I would. Have liked you get that out of the. Building there we go and then me. My shrink will go right over there. And I will use me. All right, so I’m going to go ahead and I’m going to shrink the put the shrink on these. I’m going to do them both at the same time. Come on there. So that’s done. Now we need to get the switch. Back into this housing, the way that. It was before. I can’t remember which direction it went, it looked quick, things like that. One mounting hole right there. Remember, I think that wires went up here. OK, and then we had one small screw which goes to. It’s that loose. Bolt on the opposite side. Nearest interion OK, I’m going to get this clamped out in here and then there’s the one. Screw that holds all that in. Was the smaller screw all the other ones I took out were the same size? I don’t know. How relevant this is because every Shark is different, so when you’re working on yours, you’ll want to pay attention to the size of the screws that you’re taking out because many Sharks use multiple different types of screws. And it’s important to have the right links in. Otherwise, you could potentially push through. OK, so now I’m going to. Get this thing set back in here. To those of you who are considering replacing this hose on your Shark. It’s a pain in the butt. Right, so that all is set safely out of the way now, and if we. Look, this goes up. And we’ll depress that switch when it comes back. It will UN depress that switch. So, remember that we had a one side plate here that fell off when we. Took it apart. I’m going to put. That back in again and then. Also remember that we have this one wire that goes to the light, so we’ll. Need to plug that wire in down here. And then drop the top cover. Back directly onto the top, and that’s good and tight, we’re. Going to hold it while we flip it over. And then. I’m going to put the center screw in first, so everything is. So, nothing shifts on me. OK, now we’ll get all the other screws in. All right, and now I’m going to go ahead and put the wheels back in. These just simply pressure fit. I’ll line them up right because you’ve got that felt on one side. So, you’ve got to. Kind of. Line it you and then you will. Press them in. So, one side isn’t quite in. Usually have them in there. You go. And those spin free. Right and that. Is that that is how you replace a Shark vacuum brush roller micro switch. Thank you for watching!